Lawn Mower Tips: How to Check and Test an Alternator With A Multimeter
Tools Official on Jun 12, 2024
We earn affiliate commissions at no extra cost to you.
Owning a lawn mower means you sometimes have to deal with occasional problems, such as bad batteries, engine misfires, and electrical malfunctions.
If you think a damaged alternator is the cause, we can help.
We have outlined a step-by-step guide to test an alternator and how to replace it.
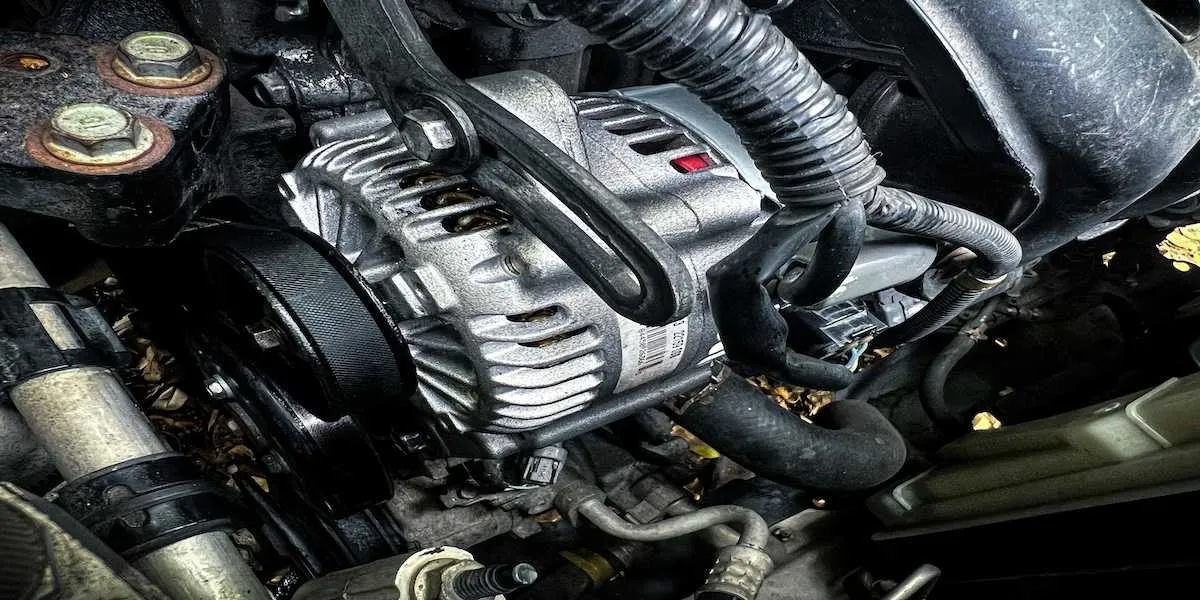
What is an alternator?
The alternator is an essential part of the electrical system in many engines. Its primary function is to generate electrical power to charge the battery and run the machine while the engine is working.
If we want to get technical, an alternator converts mechanical energy into electrical energy in the form of alternating current (AC). This AC power is converted to direct current (DC) to charge the battery and power the electrical components.
Its rotor spins within a stator, creating a magnetic field that induces a current. A voltage regulator regulates this current to ensure consistent power output.
These devices can be found in cars and lawnmowers. Unlike the ones found in cars, which are driven by a serpentine belt, lawn mower alternators are often integrated into the flywheel or driven by a belt directly from the engine.
Charging Systems in Lawn Mowers
Lawn mower alternators keep the battery charged, powering accessories like lights and other electrical components. Without a functioning alternator, the battery would quickly drain, leaving the mower inoperable. Keeping it in good working condition is crucial in maintaining the optimal performance of your lawn mower.
It's important to note that these devices are typically found in riding lawnmowers, which have more complex systems compared to push mowers. Riding mowers have additional features and accessories that require a steady power supply, making the alternator an essential component in these machines.
Signs of a Bad Alternator

A bad alternator can manifest in several ways. Recognizing the symptoms of a failing one can help you address the issues before they lead to more significant problems. Here are some common signs to look out for.
1. Dead battery
One of the most obvious signs of a failing alternator is a dead battery. If your mower won't start, the alternator may not be charging it properly. A properly functioning alternator continuously replenishes the battery's charge while the engine is running. Without this, the battery will lose power over time, especially if the mower has additional accessories that draw power.
2. Battery Drains
Even if the battery isn't completely dead, you might notice it drains faster than usual. This could be due to the alternator not generating enough power, causing the battery to supply the needed electricity and subsequently draining it. This constant drain can lead to the battery's premature failure. You may find yourself charging the battery more frequently, only for it to deplete again after a short period of use.
3. Frequent Stalling
A bad alternator can cause the engine to stall frequently. The engine relies on a consistent supply of electricity to maintain its operation. When the device fails, it disrupts this supply, causing the engine to stall unexpectedly. If you're in the middle of mowing your lawn, this can be particularly troublesome.
4. Starting Problems
Difficulty in starting the lawn mower can also be a sign of a faulty alternator. If it's not charging the battery, the engine may not have enough power to start. This can manifest as the engine turning over slowly or failing to turn over at all. You might also notice that the started motor sounds weak or struggles to engage.
5. Flickering lights
Flickering or dim lights on your lawn mower may indicate an inconsistent power supply. The lights rely on the electrical system, which is powered by the alternator. If you see your mower's light flickering or varying brightness, it's a clear sign that the electrical components isn't receiving a steady flow of electricity. Dim lights indicate a weak alternator and bright lights mean it is overcharged.
Testing an Alternator With a Multimeter
If you see the above-mentioned symptoms manifesting in your lawn mower, first check your alternator if it is indeed the source of the problem. Here's how you can do it.
Things you’ll need:
- Multimeter
- Screwdriver
- Wrenches
- Safety gloves
Initial Troubleshooting:
The simplest way to check your alternator for damage is by using the headlights of your lawn mower or outdoor power equipment. Turn on the headlights and then turn off the engine. If the lights dim, the alternator is working. If not, then maybe your alternator is indeed damaged and needs replacement.
If this method isn't feasible, follow these steps.
Step 1: Turn off the lawn mower.
Place your lawn mower on a flat surface and turn off the engine. Do not inspect if the engine's still running hot. Disconnect the battery to avoid any accidental shorts. And of course, safety first. Wear gloves and take necessary safety precautions to prevent injuries.
Step 2: Locate the alternator.
Consult the mower's manual to locate the alternator. It's usually found near the engine and connected to the battery. The manual will provide detailed instructions and diagrams, making it easier to identify the device's exact location and its components.
Step 3: Inspect for physical damage.
Sometimes, a visual inspection can reveal issues. Check the alternator for any obvious signs of damage, such as cracks, burns, or loose parts. Physical damage can often indicate internal issues that affect performance. Look for signs of overheating or burnt smells.
Step 4: Test with a multimeter.
Set the multimeter to measure system voltage. Reconnect the battery and start the engine. Set your multimeter probes on the battery terminals, red to the positive terminal and black to the negative terminal. Check the reading. A healthy alternator should produce a voltage between 13.5 to 14.75 volts. This range indicates it is charging the battery correctly.
Step 5: Check the Alternator Output
To further confirm, measure the voltage output directly from the alternator. This will involve checking the terminals as specified in the manual. Compare the readings with the manufacturer's specifications to determine if the it is functioning properly. This step helps isolate whether the issue is with the alternator itself or another part of the system.
Things to Keep in Mind
If you can't find any damage to the alternator, the problem may lie somewhere. Here's what you can do.
Check the engine battery.
Make sure your battery is in good condition. Use a multimeter to check the voltage. A fully charged battery in riding mowers should read around 12.6 volts. If the battery is low, charge it and test again. If it still reads low, the battery might be the issue.
To further confirm, perform a load test on the battery. If the battery voltage significantly drops during the test, the battery is likely faulty.
Inspect the wiring.
Inspect all the wirings connected to the alternator, to check out possible causes of failure. Look for any loose connections, fraying, or corrosion. Secure any loose connections and clean any corroded terminals. Wiring issues can mimic alternator problems, so it's crucial to ensure all connections are intact.
How to Replace Damaged Alternator

Once you've completed the alternator test and determined that it's faulty, replacing it is the only option you have. Follow these steps.
Things you’ll need:
- Replacement device
- Socket set
- Screwdrivers
- Safety gloves
Step 1: Turn off your lawn mower.
Again, safety is paramount. Before doing anything to the lawn mower, make sure it's disconnected from its power source.
Step 2: Detach the old alternator.
Locate the alternator on your lawn mower. You can refer to your mower's service manual. Use a wrench to remove the bolts holding the device place and carefully disconnect any wiring.
Keep track of any screws, bolts, or connectors you remove. Take pictures if necessary so you can reassemble everything correctly.
Step 3: Remove the drive belt.
If your alternator is driven by a belt, you will need to remove it. Loosen the tensioner pulley to slip the belt off the device. Inspect the belt for any signs of wear or damage, and replace it if necessary. A worn belt can affect the performance of the new alternator.
Step 4: Install the new alternator.
Position the new alternator in place and secure it with bolts. Reconnect any wiring and ensure all connections are tight and secure. Refer to the service manual for specific torque settings to avoid over or under-tightening. Double check all connections before proceeding to the next step.
Step 5: Reattach belts and covers.
Reattach any belts or covers that were removed to access the alternator. Make sure the belts are properly tensioned. Too loose and it might slip. Too tight, and it could cause premature wear. Adjust them appropriately.
Step 6: Reconnect the battery and test.
Reconnect the battery and start the engine. Use a multimeter to test your alternator's voltage output. Connect it to the diode terminals, the way we've done when we tested your alternator. Note the voltage to see if it's around 13-14 volts. This final check confirms that the new device is working correctly and that the installation is successful.
Final Thoughts
Recognizing the signs of a faulty alternator and knowing how to check for damage is essential if you own a lawn mower. A properly functioning equipment not only makes lawn care easier but also extends the lifespan of your lawn mower.
Happy mowing!